Stretching the c64 Palette
Abstract: Presents some methods to stretch the limited c64 palette for obtaining large colour gradients.
Topics: c64, color palettes
© Copyright Daniel Krajzewicz, 14.08.2017 22:15, cc by
Introduction
The Commodore c64 has a very limited palette of 16 colours with different brightness levels, as shown in Figure 1. Please note that I use the RGB representation of the c64 palette as defined within WinVice, an emulator of some computers, including the c64.
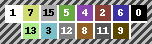
Figure 1: The c64 colors sorted by brightness.
The palette allowed for some basic gradients. Initially, these gradients were usually composed of colours from similar hue ranges — probably based on names only, e.g. red, light red, light grey. As the given colours were spread along the brightness axis, only few of such gradients could be constructed. Mirrored, this yield in raster bars of a small size, as shown in Figure 2. Please note that they are enlarged to make them more visible.


Figure 2: Basic monochrome raster bars (enlarged).
Later, multichrome palettes that used the complete brightness range were introduced. Usually, one could find the blueish and the reddish versions, later came the green/grey/brown one. These most common multichrome bars are shown respectively in Figure 3.


Figure 3: Basic multichrome bars (enlarged).
In the following, some further often found combinations, shown in Figure 4, will be used additionally.


Figure 4: Some further color bars.
These gradients were used for different purposes. The most obvious one is “rasters” or “raster bars” — straight lines obtained by changing the background and the border colours in each scan line. But the gradients were as well used in multicolor logos, for fading text, etc. Still, some demo layouts or ideas required to fill a larger part of the screen than achievable using the plain round bars. A simple repetition of “known” raster bars can be found since the very begin of rasters, though one should state they're rather boring, old-school in bad sense (uh), and didn't look well at any time. But some approaches to virtually stretch the gradients were developed by employing different repetition techniques, see Figure 5.

Figure 5: Some examples for using raster bar patterns.
This article discusses these patterns, being structured as following. First, some methods for stretching round bars are given. Then, some patterns based on extrusion are presented. Finally, some further methods that do not fall into these classes are given.
Stretching Patterns
This section introduces some basic patterns for stretching raster bars.
Interlacing
One very basic method is to subdivide a plain round bar with black (or any used background color) as shown in Figure 6.

Figure 6: Patterns obtained by simple interlacing with black.
The color part was also sometimes doubled as given in Figure 7.

Figure 7: Patterns obtained by scaled interlacing with black.
One may find a Python code that generates interlaced and stretched interlaced bars below.
# builds a "simple split" bar
def build_simple_split(gradient):
    ret = []
    for c in gradient:
        ret.append(c)
        ret.append(0)
    return ret + getReverted(ret[:-3])

# builds a "scaled split" bar
def build_scaled_split(gradient):
    ret = []
    ret.append(gradient[0])
    ret.append(0)
    for c in gradient:
        for i in range(0, 2):
            ret.append(c)
        ret.append(0)
    return ret + getReverted(ret[:-4])
Poor Man's Dithering
A very early and quite often repeated pattern uses a very basic dithering method. “Dithering” tries to overcome the lack of colours by alternating the given ones. The basic version, where the major part of each color is represented using two lines and a single line dithering is used is given in Figure 8.
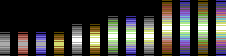
Figure 8: Patterns obtained using “Poor Man's Dithering” with a dithering scale of 2.
Dithered bars approximate the appearance of round bars. Yet, a proper usage of width per colour that would resemble the change in distance can be hardly found. Rather, all brightness have the same width. While acceptable for the small three-colours colour combinations, it destroys the appearance of a round bar when using more colours. This is even more the case when the dithering scale is enlarged. Figure 9 shows dithering with scales of 3 and 4.
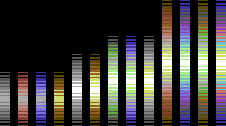

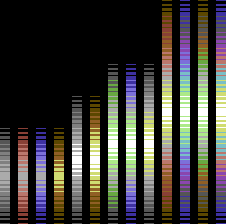
Figure 9: Patterns obtained using “Poor Man's Dithering” with a dithering scale of 3 (top) and 4 (bottom).
One may find a Python code that generates “dithered bars” below.
# builds a "dithered" bar
def build_dithering(gradient, STEPS=2):
    ret = []
    # keep the last one for dithering
    lastColor = 0
    # loop over the gradient (colors)
    for i in gradient:
        # every color has STEPS-1 dithering steps
        for j in range(0, STEPS-1):
            # build a segment of SIZE lines
            for k in range(0, STEPS):
                # "dither"
                if k<j+1:
                    ret.append(i)
                else:
                    ret.append(lastColor)
        # now a solid segment
        for j in range(0, STEPS):
            ret.append(i)
        # move to next color
        lastColor = i
    return ret + getReverted(ret)
Extrusion Patterns
Instead of simply stretching bars, some mechanisms for obtaining large patterns were based on extruding simple bars. They are given below.
Extruded-Full
Within this method, the original bar is repeatedly replicated at both sides, but the respectively brightest colour is removed at every repetition. Usually, a black line is used as a separator between the obtained bars. These fully extruded bars are shown in Figure 10.
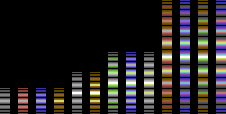
Figure 10: Patterns obtained using “Full Extrusion”.
This method does not approximate the appearance of a single round bar. Instead, one could interpret it as bars allocated along a circle or bar fading with increasing distance. But again, no attempt to have a correct scaling is done.
The code for “full extrusion” patterns follows.
# builds a "full extruded" bar
def build_extruded_full(gradient, singleMiddle=True):
    ret = []
    ret.append(gradient[0])
    ret.append(0)
    # steps==len(gradient)
    for i in range(0, len(gradient)):
        # copy according begin of the gradient
        for j in range(0, i+1):
            ret.append(gradient[j])
        # copy again, but reverted
        for j in range(0, i+1):
            ret.append(gradient[i-j])
        # add separating black line
        ret.append(0)
    ret = ret[:-1-len(gradient)] # !!!
    return ret + getReverted(ret)
Extruded-Half
Again, the original bar forms the center of this pattern. It is replicated at both sides again, but in contrary to the full extrusion, only half of the bar is repeated, again removing the respectively brightest colour at each repetition. The repetitions are divided by an additional black line as before. They are shown in Figure 11.
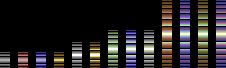
Figure 11: Patterns obtained using “Half Extrusion”.
Due to the reduction in size, an effect of depth occurs. The pattern looks like single bars would be stacked behind a central bar, and thereby introduces a depth.
# builds a "half extruded" bar
def build_extruded_half(gradient, singleMiddle=True):
    ret = []
    # steps==len(gradient)
    for i in range(0, len(gradient)):
        # copy according begin of the gradient
        for j in range(0, i+1):
            ret.append(gradient[j])
        # add separating black line
        ret.append(0)
    # remove last black line added
    ret = ret[:-1]
    return ret + getReverted(ret)
Other Patterns
Finally, a further repetition pattern is presented.
Bumped
The “bumped” pattern occured relatively late. I suppose their originators wanted to have a “round” bar of a big size, but overcoming the issue of bad scalability of the “Poor Man's Dithering”. “Bumped” bars are given in Figure 12.
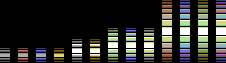
Figure 12: Patterns obtained using the “Bumped” method.
Albeit trying to obtain round bars, this attempt still does not replicate the shape correctly.
# builds a "bumped" bar
def build_bumped(gradient):
    ret = []
    rret = []
    for i in range(0, len(gradient)-1):
    tmp = []
    if i==0:
        tmp.append(gradient[0])
    elif i==1:
        tmp.append(gradient[1])
        tmp.append(gradient[0])
    elif i<len(gradient)-1:
        tmp.append(gradient[i+1])
        for j in range(0, i-1):
            tmp.append(gradient[i])
        tmp.append(gradient[i-1])
    tmp.append(0)
    for i in range(0, len(tmp)):
        ret.append(tmp[i])
        rret.insert(0, tmp[len(tmp)-1-i])
    tmp = []
    tmp.append(gradient[-2])
    for j in range(0, len(gradient)):
        tmp.append(gradient[-1])
    tmp.append(0)
    return ret + tmp + rret
Discussion
The presented patterns were used to obtain large gradients using a limited number of colours. Albeit most of them tried to replicate the appearance of distinct shapes or objects — mainly round bars — the patterns do not resemble changes in the colours' brightness level by giving them correct widths.
Ok, but what for? Besides being an appealing thing by itself that wants to be presented, such patterns can be reused in almost any media that requires a limited colour palette. One could think of colours for a building's faces, for 3D interfaces, or logo design with limited colours.
Not much effort has been put into the presented algorithms. They could be surely improved to meet some further needs or any aesthetical issues. But you may note that originally, these patterns have been hacked by hand.
Let me know if I forgot one.